
Some days ago, I learned How to create a overlay network using Open vSwitch in order to connect LXC containers. In order to extend the features of the set-up that I did there, I wanted to introduce some services: a DHCP server, a router, etc. to create a more complex infrastructure. And so this time I learned…
How to connect complex networking infrastructures with Open vSwitch and LXC containers
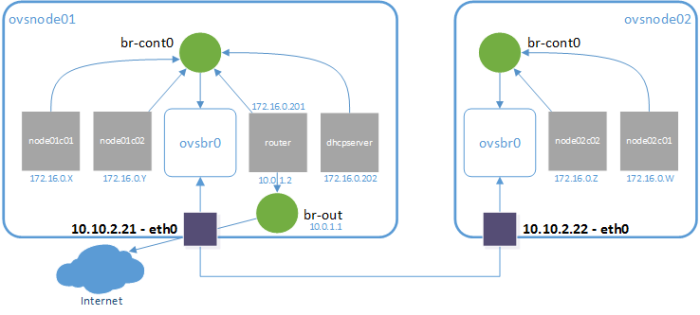
My setup is based on the previous one, to introduce common services for networked environments. In particular, I am going to create a router and a DHCP server. So I will have two nodes that will host LXC containers and they will have the following features:
- Any container in any node will get an IP address from the single DHCP server.
- Any container will have access to the internet through the single router.
- The containers will be able to connect between them using their private IP addresses.
We had the set-up in the next figure:

And now we want to get to the following set-up:
Well… we are not making anything new, because we have worked with this before in How to create a multi-LXC infrastructure using custom NAT and DHCP server. But we can see this post as an integration post.
Update of the previous setup
On each of the nodes we have to create the bridge br-cont0 and the containers that we want. Moreover, we have to create the virtual swithc ovsbr0 and to connect it to the other node.
ovsnode01:~# brctl addbr br-cont0
ovsnode01:~# ip link set dev br-cont0 up
ovsnode01:~# cat > ./internal-network.tmpl << EOF
lxc.network.type = veth
lxc.network.link = br-cont0
lxc.network.flags = up
lxc.network.hwaddr = 00:16:3e:xx:xx:xx
EOF
ovsnode01:~# lxc-create -f ./internal-network.tmpl -n node01c01 -t ubuntu
ovsnode01:~# lxc-create -f ./internal-network.tmpl -n node01c02 -t ubuntu
ovsnode01:~# apt-get install openvswitch-switch
ovsnode01:~# ovs-vsctl add-br ovsbr0
ovsnode01:~# ovs-vsctl add-port ovsbr0 br-cont0
ovsnode01:~# ovs-vsctl add-port ovsbr0 vxlan0 -- set interface vxlan0 type=vxlan options:remote_ip=10.10.2.22
Warning: we are not starting the containers, because we want them to get the IP address from our dhcp server.
Preparing a bridge to the outern world (NAT bridge)
We need a bridge that will act as a router to the external world for the router in our LAN. This is because we only have two known IP addresses (the one for ovsnode01 and the one for ovsnode02). So we’ll provide access to the Internet through one of them (according to the figure, it will be ovsnode01).
So we will create the bridge and will give it a local IP address:
ovsnode01:~# brctl addbr br-out
ovsnode01:~# ip addr add dev br-out 10.0.1.1/24
And now we will provide access to the containers that connect to that bridge through NAT. So let’s create the following script and execute it:
ovsnode01:~# cat > enable_nat.sh <<\EOF
#!/bin/bash
IFACE_WAN=eth0
IFACE_LAN=br-out
NETWORK_LAN=10.0.1.0/24

echo "1" > /proc/sys/net/ipv4/ip_forward
iptables -t nat -A POSTROUTING -o $IFACE_WAN -s $NETWORK_LAN ! -d $NETWORK_LAN -j MASQUERADE
iptables -A FORWARD -d $NETWORK_LAN -i $IFACE_WAN -o $IFACE_LAN -m state --state RELATED,ESTABLISHED -j ACCEPT
iptables -A FORWARD -s $NETWORK_LAN -i $IFACE_LAN -j ACCEPT
EOF
ovsnode01:~# chmod +x enable_nat.sh
ovsnode01:~# ./enable_nat.sh
And that’s all. Now ovsnode01 will act as a router for IP addresses in the range 10.0.1.0/24.
DHCP server
Creating a DHCP server is as easy as creating a new container, installing dnsmasq and configuring it.
ovsnode01:~# cat > ./nat-network.tmpl << EOF
lxc.network.type = veth
lxc.network.link = br-out
lxc.network.flags = up
lxc.network.hwaddr = 00:16:3e:xx:xx:xx
EOF
ovsnode01:~# lxc-create -f nat-network.tmpl -n dhcpserver -t ubuntu
ovsnode01:~# lxc-start -dn dhcpserver
ovsnode01:~# lxc-attach -n dhcpserver -- bash -c 'echo "nameserver 8.8.8.8" > /etc/resolv.conf
ip addr add 10.0.1.2/24 dev eth0
route add default gw 10.0.1.1'
ovsnode01:~# lxc-attach -n dhcpserver
WARNING: we created the container attached to br-out, because we want it to have internet access to be able to install dnsmasq. Moreover we needed to give it an IP address and set the nameserver to the one from google. Once the dhcpserver is configured, we’ll change the configuration to attach to br-cont0, because the dhcpserver only needs to access to the internal network.
Now we have to install dnsmasq:
apt-get update
apt-get install -y dnsmasq
Now we’ll configure the static network interface (172.16.0.202), by modifying the file /etc/network/interfaces
cat > /etc/network/interfaces << EOF
auto lo
iface lo inet loopback
auto eth0
iface eth0 inet static
address 172.16.1.202
netmask 255.255.255.0
EOF
And finally, we’ll configure dnsmasq
cat > /etc/dnsmasq.conf << EOF
interface=eth0
except-interface=lo
listen-address=172.16.1.202
bind-interfaces
dhcp-range=172.16.1.1,172.16.1.200,1h
dhcp-option=26,1400
dhcp-option=option:router,172.16.1.201
EOF
In this configuration we have created our range of IP addresses (from 172.16.1.1 to 172.16.1.200). We have stated that our router will have the IP address 172.16.1.201 and one important thing: we have set the MTU to 1400 (remember that when using OVS we had to set the MTU to a lower size).
Now we are ready to connect the container to br-cont0. In order to make it, we have to modify the file /var/lib/lxc/dhcpserver/config. In particular, we have to change the value of the attribute lxc.network.link from br-out to br-cont0. Once I modified it, my network configuration in that file is as follows:
# Network configuration
lxc.network.type = veth
lxc.network.flags = up
lxc.network.link = br-cont0
lxc.network.hwaddr = 00:16:3e:9f:ae:3f
Finally we can reboot our container
ovsnode01:~# lxc-stop -n dhcpserver
ovsnode01:~# lxc-start -dn dhcpserver
And we can check that our server gets the proper IP address:
root@ovsnode01:~# lxc-ls -f
NAME STATE AUTOSTART GROUPS IPV4 IPV6
dhcpserver RUNNING 0 - 172.16.1.202 -
We could also check that it is connected to the bridge:
ovsnode01:~# ip addr
...
83: vethGUV3HB: <BROADCAST,MULTICAST,UP,LOWER_UP> mtu 1500 qdisc pfifo_fast master br-cont0 state UP group default qlen 1000
 link/ether fe:86:05:f6:f4:55 brd ff:ff:ff:ff:ff:ff
ovsnode01:~# brctl show br-cont0
bridge name bridge id STP enabled interfaces
br-cont0 8000.fe3b968e0937 no vethGUV3HB
ovsnode01:~# lxc-attach -n dhcpserver -- ip link
1: lo: <LOOPBACK,UP,LOWER_UP> mtu 65536 qdisc noqueue state UNKNOWN mode DEFAULT group default
 link/loopback 00:00:00:00:00:00 brd 00:00:00:00:00:00
82: eth0: <BROADCAST,MULTICAST,UP,LOWER_UP> mtu 1500 qdisc pfifo_fast state UP mode DEFAULT group default qlen 1000
 link/ether 00:16:3e:9f:ae:3f brd ff:ff:ff:ff:ff:ff
ovsnode01:~# ethtool -S vethGUV3HB
NIC statistics:
 peer_ifindex: 82
No matter if you do not understand this… it is a very advanced issue for this post. The important thing is that bridge br-cont0 has the device vethGUV3HB, whose number is 83 and its peer interface is the 82 that, in fact, is the eth0 device from inside the container.
Installing the router
Now that we have our dhcpserver ready, we are going to create a container that will act as a router for our network. It is very easy (in fact, we have already created a router). And… this fact arises a question: why are we creating another router?
We create a new router because it has to have an IP address inside the private network and other interface in the network to which we want to provide acess from the internal network.
Once we have this issue clear, let’s create the router, which as an IP in the bridge in the internal network (br-cont0):
ovsnode01:~# cat > ./router-network.tmpl << EOF
 lxc.network.type = veth
 lxc.network.link = br-cont0
 lxc.network.flags = up
 lxc.network.hwaddr = 00:16:3e:xx:xx:xx
 lxc.network.type = veth
lxc.network.link = br-out
lxc.network.flags = up
lxc.network.hwaddr = 00:16:3e:xx:xx:xx
EOF
 ovsnode01:~# lxc-create  -t ubuntu -f router-network.tmpl -n router
WARNING: I don’t know why, but for some reason sometimes lxc 2.0.3 fails in Ubuntu 14.04 when starting containers if they are created using two NICs.
Now we can start the container and start to work with it:
ovsnode01:~# lxc-start -dn router
ovsnode01:~# lxc-attach -n router
Now we simply have to configure the IP addresses for the router (eth0 is the interface in the internal network, bridged to br-cont0, and eth1 is bridged to br-out)
cat > /etc/network/interfaces << EOF
auto lo
iface lo inet loopback

auto eth0
iface eth0 inet static
address 172.16.1.201
netmask 255.255.255.0

auto eth1
iface eth1 inet static
address 10.0.1.2
netmask 255.255.255.0
gateway 10.0.1.1
EOF
And finally create the router by using a script which is similar to the previous one:
router:~# apt-get install -y iptables
router:~# cat > enable_nat.sh <<\EOF
#!/bin/bash
IFACE_WAN=eth1
IFACE_LAN=eth0
NETWORK_LAN=172.16.1.201/24

echo "1" > /proc/sys/net/ipv4/ip_forward
iptables -t nat -A POSTROUTING -o $IFACE_WAN -s $NETWORK_LAN ! -d $NETWORK_LAN -j MASQUERADE
iptables -A FORWARD -d $NETWORK_LAN -i $IFACE_WAN -o $IFACE_LAN -m state --state RELATED,ESTABLISHED -j ACCEPT
iptables -A FORWARD -s $NETWORK_LAN -i $IFACE_LAN -j ACCEPT
EOF
router:~# chmod +x enable_nat.sh
router:~# ./enable_nat.sh
Now we have our router ready to be used.
Starting the containers
Now we can simply start the containers that we created before, and we can check that they get an IP address by DHCP:
ovsnode01:~# lxc-start -n node01c01
ovsnode01:~# lxc-start -n node01c02
ovsnode01:~# lxc-ls -f
NAME STATE AUTOSTART GROUPS IPV4 IPV6
dhcpserver RUNNING 0 - 172.16.1.202 -
node01c01 RUNNING 0 - 172.16.1.39 -
node01c02 RUNNING 0 - 172.16.1.90 -
router RUNNING 0 - 10.0.1.2, 172.16.1.201 -
And also we can check all the hops in our network, to check that it is properly configured:
ovsnode01:~# lxc-attach -n node01c01 -- apt-get install traceroute
(...)
ovsnode01:~# lxc-attach -n node01c01 -- traceroute -n www.google.es
traceroute to www.google.es (216.58.210.131), 30 hops max, 60 byte packets
 1 172.16.1.201 0.085 ms 0.040 ms 0.041 ms
 2 10.0.1.1 0.079 ms 0.144 ms 0.067 ms
 3 10.10.2.201 0.423 ms 0.517 ms 0.514 ms
...
12 216.58.210.131 8.247 ms 8.096 ms 8.195 ms
Now we can go to the other host and create the bridges, the virtual switch and the containers, as we did in the previous post.
WARNING: Just to remember, I leave this snip of code here:
ovsnode02:~# brctl addbr br-cont0
ovsnode02:~# ip link set dev br-cont0 up
ovsnode02:~# cat > ./internal-network.tmpl << EOF
lxc.network.type = veth
lxc.network.link = br-cont0
lxc.network.flags = up
lxc.network.hwaddr = 00:16:3e:xx:xx:xx
EOF
ovsnode02:~# lxc-create -f ./internal-network.tmpl -n node01c01 -t ubuntu
ovsnode02:~# lxc-create -f ./internal-network.tmpl -n node01c02 -t ubuntu
ovsnode02:~# apt-get install openvswitch-switch
ovsnode02:~# ovs-vsctl add-br ovsbr0
ovsnode02:~# ovs-vsctl add-port ovsbr0 br-cont0
ovsnode02:~# ovs-vsctl add-port ovsbr0 vxlan0 — set interface vxlan0 type=vxlan options:remote_ip=10.10.2.21
And finally, we can start the containers and check that they get IP addresses from the DHCP server, and that they have connectivity to the internet using the routers that we have created:
ovsnode02:~# lxc-start -n node02c01
ovsnode02:~# lxc-start -n node02c02
ovsnode02:~# lxc-ls -f
NAME STATE IPV4 IPV6 AUTOSTART
-------------------------------------------------
node02c01 RUNNING 172.16.1.50 - NO
node02c02 RUNNING 172.16.1.133 - NO
ovsnode02:~# lxc-attach -n node02c01 -- apt-get install traceroute
(...)
ovsnode02:~# lxc-attach -n node02c01 -- traceroute -n www.google.es
traceroute to www.google.es (216.58.210.131), 30 hops max, 60 byte packets
 1 172.16.1.201 0.904 ms 0.722 ms 0.679 ms
 2 10.0.1.1 0.853 ms 0.759 ms 0.918 ms
 3 10.10.2.201 1.774 ms 1.496 ms 1.603 ms
...
12 216.58.210.131 8.849 ms 8.773 ms 9.062 ms
What is next?
Well, you’d probably want to persist the settings. Maybe you can set the iptables rules (aka the enable_nat.sh script) as a start script in /etc/init.d
As a further work, you can try VLAN tagging in OVS and so on, to duplicate the networks using the same components, but isolating the different networks.
You can also try to include new services (e.g. a private DNS server, a reverse NAT, etc.).

Hi Carlos this is a great post! What graphic program did you use to create the setup figures showing the topology of your setups? I like the diagrams and would like to produce similar. Thanks!
LikeLike
Hi, thank you for your greetings… I made these figures using MS Visio. Regards
LikeLike
Hi again Carlos. Also, what are your opinions on pros and cons of these two approaches (i.e. the linux bridge can be omitted and just attach the containers and the tunnels directly to the OpenvSwitch. Just wondering if you see any advantages in using the Linux bridge in the setup since it’s not absolutely necessary. Thanks
containers-bridge-openvswitch-vxlan-openvswitch-bridge-containers
vs
containers-openvswitch-vxlan-openvswitch-containers
LikeLike
Using the extra bridge enables to easily include several containers in the same vxlan with minimal effort. Moreover it is possible to add iptables rules to the bridges to create firewall rules or create the so called security groups. If you are only using one container, the extra bridge is not needed unless you want to include the firewall. The other approach is to add each container to a different ovs port. In such case, the advise is the same: not to use the extra bridges unless you need to add iptables rules. Regards.
LikeLike